
.jpg) Mira Gwehn Revilla
Mira Gwehn Revilla
How to Reduce Patient No-Shows With Smart Reminder Workflows
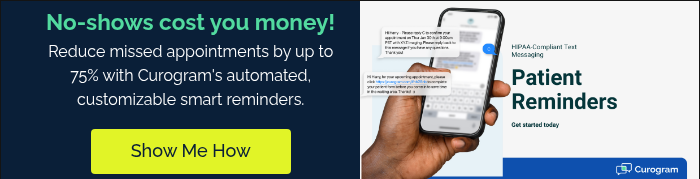
💡 Medical practices can cut patient no-shows by as much as 75% using smart reminder workflows. These automated systems send appointment...

Your front desk team is drowning in phone calls. They spend hours each day calling patients to confirm visits, only to reach voicemail after voicemail.
Meanwhile, patients still miss their slots because they forgot or lost track of the date. It's a cycle that wastes time and costs your practice real money.
That's where Curogram appointment automation changes the game. With the right setup, you can send text reminders that reach patients where they already are — on their phones.
SMS has a 98% open rate, which means nearly every patient sees your message. No more wasted calls. No more empty chairs. No more staff burning out on tasks a smart system can handle.
The problem isn't that your team doesn't work hard. They do. But manual phone calls are slow, costly, and easy to miss.
A single front desk person can only make so many calls per hour. One missed call turns into a no-show, and that empty slot is revenue your practice never gets back.
Automated text reminders fix this at the root. Patients get a quick, clear message they can respond to in seconds. Your staff gets time back to focus on the people standing right in front of them. Everyone wins.
This Curogram setup guide walks you through every step of the process. You'll learn how to configure Curogram reminders, build custom templates, set up two-way replies, and connect your EMR.
Whether you run a small family practice or a busy multi-site clinic, this guide was built for you. By the end, you'll have a fully working reminder system that saves your team hours each week.
Before you dive into the Curogram appointment reminders setup, take a moment to check that you have a few things in place. Think of this step like prepping a recipe. You need all your tools and items ready before you turn on the stove.
Skipping this step can lead to delays and rework down the road. Here's what you need before you begin:
An active Curogram account. If you haven't signed up yet, reach out to the Curogram team to get your login and access. Your account admin should have full access to the settings panel.
Your EMR link must be working or your data import method must be set. Curogram works with almost any EMR system, which means your patient and visit data can flow right in. If the link isn't done yet, work with your IT team or Curogram support to finish it first.
Staff training should be on the calendar. You don't need to train your team right now. But you should have a date picked so that your team is ready to use the system the day you go live.
Your visit types should be defined. For example, you might have new patient visits, follow-ups, annual exams, or consults. Knowing your visit types helps you create the right message for each one later on.
Patient consent must be in place. HIPAA rules require you to get consent before texting patients. Make sure your intake forms include a line where patients agree to get SMS from your office. This keeps you safe and builds trust.
Once all five items are checked off, you're ready to move forward. Taking ten minutes to prep now will save you hours of backtracking later in the setup process.
Setting your reminder schedule is the first hands-on step when you set up Curogram. This is where you tell the system when to send each reminder and how often.
Get this part right, and your patients will show up more often. Get it wrong, and your messages might land too early or too late.
Start by logging into your Curogram dashboard and going to the reminder settings panel. You'll see options to set the timing for each reminder in your sequence.
Most practices find that two reminders work best — one sent 48 hours before the visit and one sent the morning of the visit.
The 48-hour reminder gives patients enough time to plan. They can adjust their work, set up a ride, or call your office to reschedule if needed. The day-of reminder acts as a final nudge. It keeps the visit top of mind right when it matters most.
You can also set reminder windows so that messages only go out during certain hours. For example, you might want texts to send between 8 AM and 7 PM local time. This avoids waking patients with early morning alerts or late-night pings.
If your practice serves more than one type of patient, think about tweaks for each group. A dental office might send a 72-hour reminder for root canals because patients need more prep time.
A quick check-up might only need a same-day reminder. The Curogram reminder configuration screen lets you set rules by visit type so each patient gets the right message at the right time.
Once you've dialed in your schedule, save the settings and move on to building your templates. The timing you set here forms the backbone of your whole workflow.
Now that your schedule is set, it's time to write the actual messages your patients will see. This is one of the most important parts of the process. A good template feels personal, clear, and easy to act on. A bad one feels like spam and gets ignored.
Start by opening the template section in your Curogram dashboard. You'll find a set of default templates that are ready to use right away. These are a solid starting point, but you should change them to match your practice's voice and style.
|
Here's what a strong reminder template looks like: "Hi [First Name], this is a reminder about your visit at [Practice Name] on [Date] at [Time] with [Provider]. Reply YES to confirm or call us at [Phone]." |
Notice the use of dynamic fields in brackets. Curogram fills these in with each patient's real details when the message sends. This makes every text feel personal without extra work from your staff.
You can also create different templates for different visit types. For example, a new patient visit might include a note about arriving 15 minutes early to fill out forms.
A follow-up visit might remind the patient to bring their latest test results. These small touches make a big difference in how patients see your practice.
Keep your templates short and direct. Aim for two to three sentences at most. Patients read texts fast, so every word should earn its place.
Avoid using medical terms or complex words. A phrase like "your upcoming appointment" works better than "your forthcoming clinical consultation."
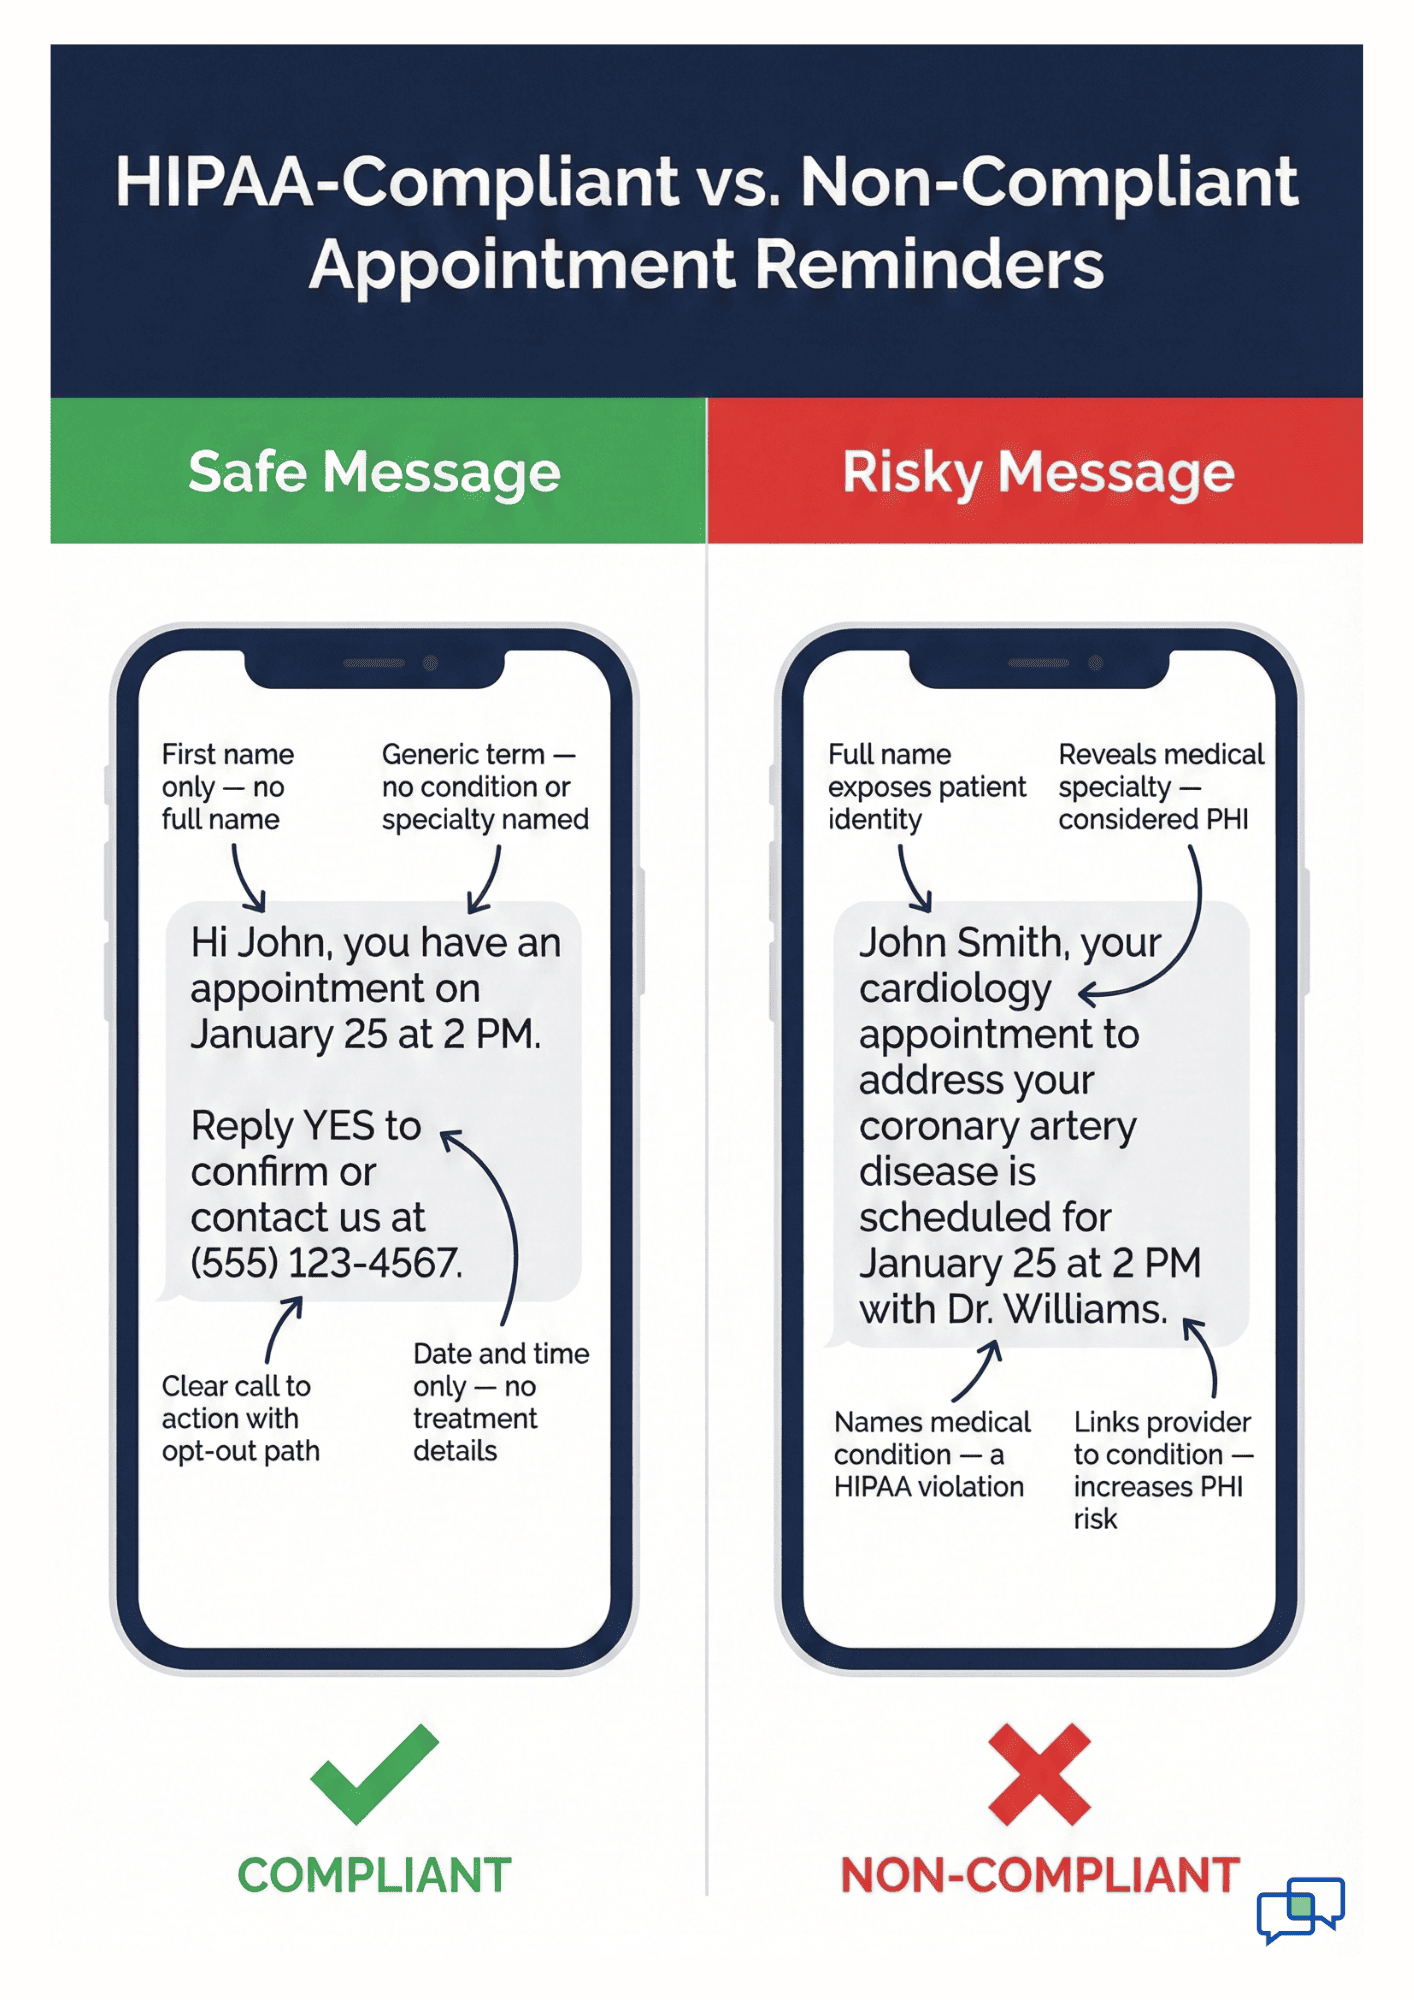
Also, make sure your templates follow HIPAA rules. Never include details about a patient's condition or the reason for their visit in a standard SMS.
A message like "your appointment on January 25 at 2 PM" is safe. A message that names a medical condition is not.
Save each template and link it to the right visit type. You can always come back and edit them once you see how patients respond.
One of the best features of Curogram is two-way texting. This means your patients can reply to reminders, and the system handles those replies on its own. It saves your staff from making dozens of follow-up calls each day.
To get started, go to the response settings area in your dashboard. Here you'll turn on two-way replies and set up the keywords patients can use.
The most common setup uses three simple responses: YES to confirm, NO to cancel, and RESCHEDULE to request a new time.
When a patient texts YES, Curogram marks the visit as confirmed right away. Your staff can see the updated status on the dashboard without lifting a finger.
When a patient texts NO or CANCEL, the system flags the visit and can trigger a follow-up task for your team to fill the open slot.
You'll also want to set a response timeout rule. This tells the system what to do if a patient doesn't reply at all.
|
For example: You might set a rule that if no reply comes within 24 hours of the first reminder, a second reminder goes out. If there's still no reply by the morning of the visit, the system can flag the patient as "unconfirmed" for your front desk to call. |
Think about edge cases too. What happens if a patient texts something other than your set keywords? For instance, they might reply "OK" or "Sure" instead of "YES." You can add extra keywords to your rules so the system catches these common replies.
Test your rules with a few sample messages before you go live. Send yourself a test reminder, reply with each keyword, and check that the system responds the way you expect. This quick test can save a lot of headaches later.
Every patient is different. Some prefer texts, while others want calls or emails. Some speak English, while others are more at ease in Spanish or another language. This step helps you respect those choices while staying on the right side of HIPAA.
Start by setting up language options in Curogram. If your practice serves patients who speak more than one language, you can create reminder templates in each language. When a patient's profile shows their preferred language, the system sends the right version on its own.
Next, set up your opt-out process. Federal rules require that patients can stop getting texts at any time. Curogram handles this by watching for keywords like STOP or UNSUBSCRIBE. When a patient sends one of these words, the system removes them from future texts right away and logs the opt-out for your records.
You should also track contact method choices in each patient's profile. Some patients might want texts for reminders but prefer a phone call for lab results. Keeping these details up to date helps your team send the right message through the right channel every time.
HIPAA consent is a key part of this step. Make sure your intake forms clearly ask patients if they agree to get SMS reminders. Store that consent on file, either in your EMR or in a signed form. If a patient later asks about their consent, you need to be able to pull it up fast.
Finally, build a simple process for updating these choices. If a patient calls and says they want to switch from texts to emails, your front desk should know exactly how to make that change in the system. A quick one-page guide posted near the front desk can make this easy for everyone.
Your EMR is the single source of truth for your practice. It holds every patient's name, phone number, visit date, and provider details. For Curogram to work well, it needs to pull this data in real time. This step makes sure the two systems talk to each other without gaps.
Check that your EMR link is active and syncing. Log into Curogram and go to the settings area for your EMR link.
You should see the date and time of the last sync. If it looks recent, you're in good shape. If it's old or shows an error, reach out to support before moving on.
Next, test the sync by creating a new visit in your EMR. After a few minutes, check Curogram to see if that visit shows up. If it does, your data is flowing the right way. This is a core part of the Curogram implementation process because if data doesn't sync, reminders won't send.
|
You'll also want to map your visit types: Your EMR might call a visit "New Patient Exam" while Curogram calls it "New Visit." Mapping links these names so the right template goes out for each visit type. Take a few minutes to match all your visit types now to avoid mix-ups later. |
Set your sync timing based on how your practice works. Some offices book visits weeks ahead and a daily sync is fine.
Others fill slots same-day and need syncing every few minutes. Choose the option that fits your workflow so patients always get timely reminders.
If you run into sync issues, the most common fix is to check your login details for the EMR link. A changed password or expired token can break the connection. Curogram support can walk you through the fix in minutes.
Testing is the safety net between setup and launch. It's where you catch problems before your patients do. Skip this step and you risk sending wrong times, blank messages, or no reminders at all.
Start by creating two or three test visits in your EMR. Use fake patient names but real phone numbers — yours and a coworker's.
Make sure the visits cover different types, like a new patient visit and a follow-up. This way you test more than one template and timing rule at once. After the visits sync to Curogram, watch for the first reminder to arrive.
|
Check three things when it lands on your phone:
|
Now test the reply flow. Text YES back and check if the visit status changes on the dashboard. Then test NO and see if it flags the visit for your team. If you set up extra keywords like OK or SURE, test those too.
Check that the data flows back to your EMR if you've set up a return sync. Some practices want the confirmed status to show in the EMR chart. Others only track it in Curogram. Either way, verify that the data lands where you expect.
Finally, review the timing of each message. If your first reminder was set for 48 hours before the visit, did it actually send 48 hours out? Small timezone issues can throw off timing by hours.
Make sure your Curogram account is set to the same timezone as your practice. Document any issues you find during testing and fix them before moving to the staff training step.
A great system means nothing if your team doesn't know how to use it. Staff training is what turns your Curogram setup from a tech project into a real workflow. Keep the training short, hands-on, and focused on daily tasks.
Start with a dashboard walkthrough. Show your team where to find the main screens: the reminder queue, the reply log, and the patient status list.
Curogram's platform was built to be simple, and most staff can learn it in less than 10 minutes. Point out how to see which patients confirmed, which cancelled, and which haven't replied yet.
Next, cover how to handle common actions. When a patient confirms, no action is needed — the system takes care of it. When a patient cancels via text, your team should know how to open that slot for a new booking. Walk through the steps live so they can see it in real time.
Train your team on how to answer patient questions that come in by text. A patient might reply with a question like "Can I bring my child?" or "Where do I park?" Your staff should know how to reply through the Curogram platform and keep the exchange HIPAA safe.
Cover the override and exception process too. Sometimes a patient needs a manual reminder outside the normal schedule.
Maybe they rebooked at the last minute and the auto-reminder window has passed. Show your staff how to send a one-off reminder for these cases.
End the training with a quick look at the reports section. Show your team how to pull up key numbers like confirmation rate, no-show rate, and response time. These reports help everyone see the impact of the new system and spot areas that need tweaking.
Give each team member a one-page cheat sheet with the top five tasks they'll do each day. Keep it taped near their monitor for quick reference during the first few weeks.

You've built, tested, and trained. Now it's time to go live. But a smart launch doesn't mean flipping the switch for every patient at once. A soft launch lowers risk and gives your team time to adjust.
Start by turning on reminders for one provider or one visit type. For example, you might launch with just follow-up visits for a single doctor. This keeps the volume low so your team can watch each reminder closely and catch any issues early.
Let your patients know that the system is new. A short message on your patient portal or a note at check-in can set the right tone. Something like "We now send text reminders for your visits. Reply YES to confirm!" is simple and clear.
|
During the first week: Check your key numbers every day. Look at how many reminders went out, how many patients replied, and how many confirmed. Track your no-show rate too. If you see anything odd — like reminders not sending or replies not coming through — dig into the issue right away. After the first week: Expand the launch to more providers and visit types. By now your team should feel at ease with the dashboard and the daily workflow. Keep an eye on the numbers, but shift from daily checks to weekly reviews. At the end of the first month: Pull a full report. Compare your no-show rate now to what it was before you set up Curogram. |
Many practices see no-show rates drop by 30% or more once they switch to setup patient reminders Curogram style with two-way texts. Share these wins with your team to build support for the new system.
Use what you learn to make small tweaks. Maybe your 48-hour reminder needs to shift to 72 hours. Maybe a template needs clearer wording. These small changes over time lead to big results.
Even the best setup can hit a bump or two. Knowing the most common problems — and how to fix them fast — keeps your workflow running smooth. Here are the top issues practices run into after launch and how to solve each one:
Reminders Not Sending - The usual cause is a data sync issue between your EMR and Curogram. Check your EMR link settings to make sure the connection is active. Look at the last sync time on your dashboard. If the sync stopped, a simple reconnect often fixes it.
Wrong Timing - If reminders arrive too early or too late, check your timezone settings in Curogram. Your account timezone should match the timezone where your practice is located. A mismatch of even one hour can throw off your whole schedule.
Patients Not Getting Texts - The most likely one is a wrong phone number in your EMR. If the number on file is a landline or has a typo, the text won't reach them. Run a quick report of failed deliveries and cross-check the numbers against your EMR records.
Responses Not Being Processed - This usually means the patient typed something the system doesn't recognize. If your keywords are YES and NO but the patient types "Yep," the system may not know what to do. Add common reply words to your keyword list to catch these cases.
If you run into an issue you can't solve on your own, Curogram's support team is there to help. You can reach them through the in-app chat or by phone. For urgent issues, they offer same-day help so your reminders stay on track.
Keep a log of any issues and how they were fixed — this becomes a handy resource for your team over time.
Setting up automated reminders in Curogram is one of the smartest moves a medical practice can make. It saves your staff hours of phone time each week. It gives patients a simple way to confirm or cancel by text. And it can cut your no-show rate in a matter of weeks.
This guide walked you through the full process step by step. You started by prepping your account, EMR link, and consent forms.
Then you built your reminder schedule, wrote custom templates, and turned on two-way replies. From there, you set up patient choices, tested the workflow, trained your team, and launched with a soft rollout.
The key to long-term success is to keep watching your numbers and making small tweaks. Check your confirmation rates, review your templates, and listen to patient feedback. Even a small change — like adding a new reply keyword or shifting your reminder timing by a few hours — can boost your results.
If you haven't started your Curogram onboarding yet, now is the time. The platform is built to be simple, fast, and easy to learn. Most practices complete the full setup in one to two weeks and start seeing results right away.
Remember, every missed visit is lost revenue and a missed chance to help a patient. With the right Curogram appointment automation in place, your team can focus on what they do best — caring for people, not chasing them down by phone. Take the first step today and get your reminder system up and running.
Curious what this looks like for your practice? Request a demo now to see your own appointment types, templates, and reminder flow built out in real time.

💡 Medical practices can cut patient no-shows by as much as 75% using smart reminder workflows. These automated systems send appointment...

💡 Choosing the right appointment reminder software in 2026 depends on your practice size, budget, and EMR. Top options include Curogram,...

💡 Medical practices lose thousands of dollars every month from missed appointments. Automated appointment reminders help solve this problem by...