
 Aubreigh Lee Daculug
Curogram EMR Integrations: Complete List and Setup Guides
💡 Curogram EMR integrations connect your electronic medical records system with a HIPAA-compliant communication platform. The software supports...

Your practice runs on connected systems. When those systems don't talk to each other, your staff wastes time on double data entry, missed appointments slip through the cracks, and patients notice the gaps.
That's exactly why a solid integration setup guide matters so much for any medical practice looking to get the most out of its technology stack.
Curogram technical documentation is built for developers, IT managers, and practice administrators who want to connect Curogram's patient communication platform with their existing systems. Whether you're working with a modern cloud-based EHR or an older on-premise solution, this guide gives you a clear path to follow from start to finish.
In this article, you'll find everything you need to plan, build, test, and maintain your Curogram integration. We cover the full scope of the Curogram API documentation, including REST endpoints, webhooks, and HL7 messaging for legacy platforms.
You'll also learn about authentication, data mapping, error handling, and performance best practices.
Think of this as your go-to technical implementation guide for connecting Curogram to your practice. We wrote it in plain language so that both technical and non-technical team members can follow along.
By the end, you'll have a clear picture of how API integration in healthcare works with Curogram and the confidence to move forward with your project.
Beyond the technical steps, integration success also depends on workflow planning and team alignment. This guide offers tips on coordinating between departments, prioritizing which systems to connect first, and measuring the impact of automation on day-to-day operations.
By planning carefully, you can reduce errors, save staff time, and ensure that patients enjoy a seamless experience.
Finally, we emphasize ongoing maintenance and monitoring. Healthcare technology is always evolving, and a connection that works today might require updates tomorrow.
We provide strategies for keeping your integration secure, troubleshooting issues quickly, and scaling your setup as your practice grows. With this guidance, you’ll not only implement your integration successfully but also maintain it with confidence long-term.
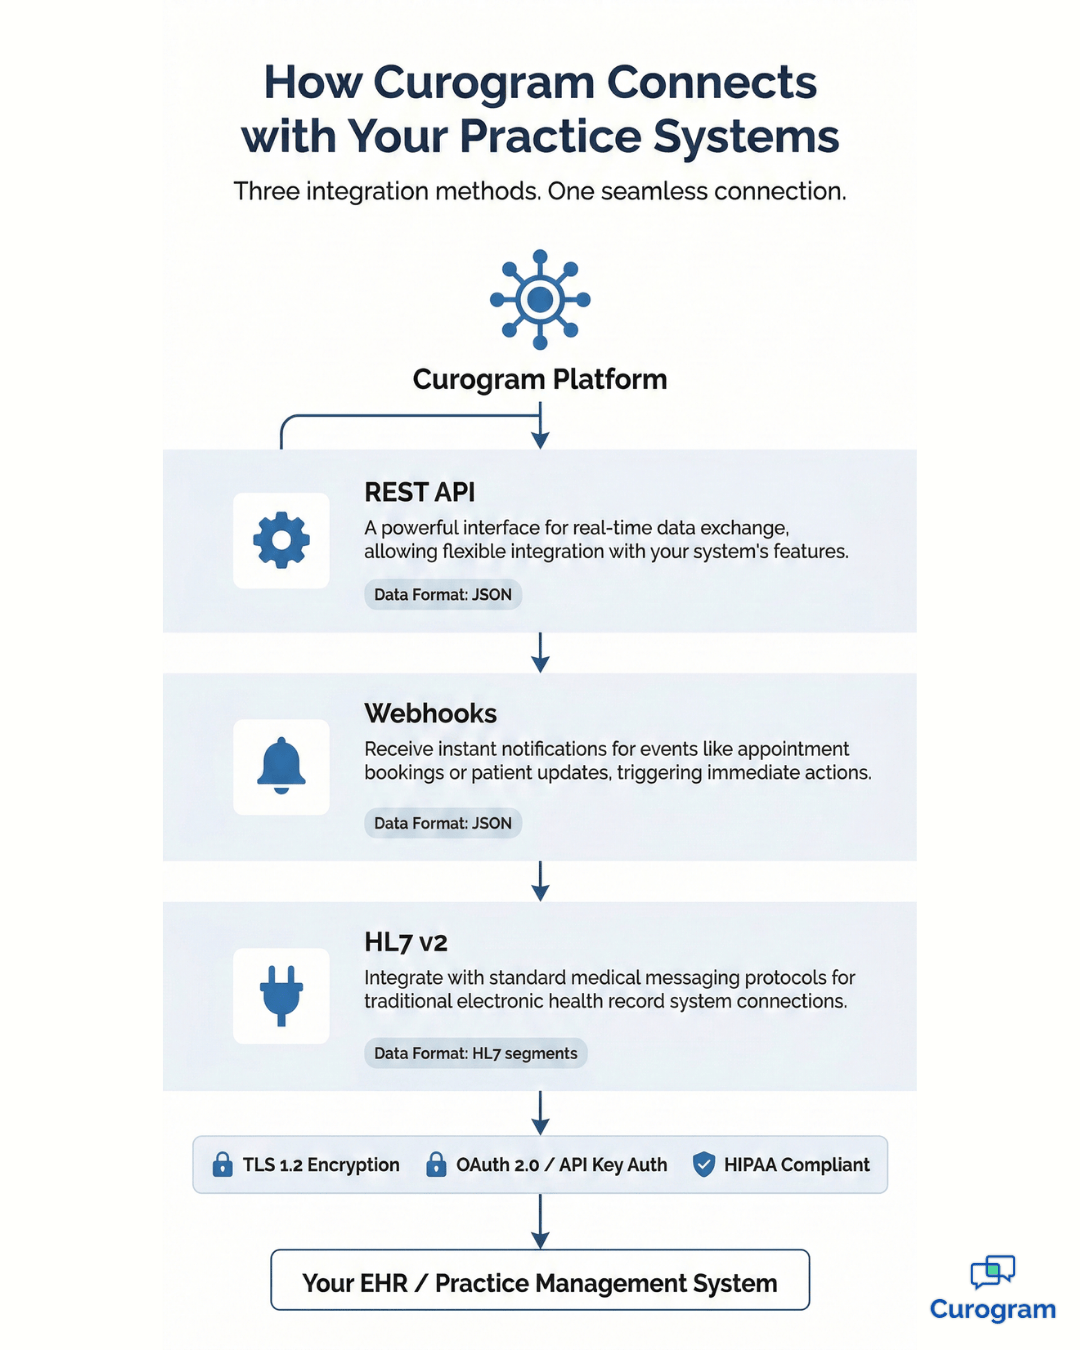
Before you write a single line of code, it helps to understand how Curogram connects with your practice systems at a high level, including understanding PACS system works in relation to imaging data exchange. The platform uses a modern, layered architecture that supports multiple integration methods. This design gives your team the flexibility to choose the approach that best fits your current setup.
At its core, the architecture separates data exchange from event handling. Your system sends and receives structured data through API calls, while webhooks handle real-time notifications in the background.
This separation keeps things clean and makes it easier to troubleshoot when something goes wrong.
Curogram offers three main integration methods: REST API, HL7 messaging, and webhooks. Each method serves a different purpose, and many practices use more than one.
The table below gives you a quick comparison to help you decide where to start.
| Method | Best For | Data Format | Real-Time | Legacy Support |
|---|---|---|---|---|
| REST API | Modern EHR systems and cloud platforms | JSON | On request | No |
| Webhooks | Event-driven updates and notifications | JSON | Yes | No |
| HL7 v2 | Older EHR and practice management systems | HL7 segments | Varies | Yes |
The REST API is the most common choice for practices with modern EHR systems. It lets you send and receive data using simple web requests in JSON format. For practices still running older systems, HL7 v2 messaging provides a well-known standard for exchanging clinical data.
Webhooks add a real-time layer on top of the REST API, pushing automatic notifications to your system whenever something changes in Curogram.
Many practices begin with the REST API alone and layer on webhooks once their basic sync is working. This staged approach keeps the project manageable and lets your team learn the platform step by step without trying to tackle everything at once.
All connections run through secure, encrypted channels that meet HIPAA requirements. Curogram's architecture also includes built-in rate limits and monitoring tools so you can track how your integration performs over time.
You can access support and developer resources directly from the Curogram developer docs portal, which includes sandbox environments for safe testing. Whether you're building from scratch or connecting an existing system, the architecture is designed to make your job easier.
The developer portal also hosts a community forum where other IT teams share integration tips and common solutions. This peer knowledge can save you hours of troubleshooting, especially during the early stages of your project.
Security is the foundation of any healthcare integration, and Curogram takes it seriously. Before your system can access any data, it needs to prove its identity through a secure authentication process. Curogram supports both API key-based access and OAuth 2.0 authentication flows.
To get started, you'll generate an API key from your Curogram admin panel. This key acts like a digital password that your system includes with every request.
For more advanced setups, OAuth 2.0 gives you token-based access with automatic refresh cycles. Tokens expire after a set period, which adds an extra layer of protection.
The choice between API keys and OAuth depends on your use case. API keys work well for server-to-server connections where your backend communicates directly with Curogram. OAuth 2.0 is a better fit when multiple services or users need scoped access to different parts of the platform.
Every API call is logged for audit purposes, giving your compliance team full visibility into who accessed what data and when. This is a core part of meeting HIPAA compliance requirements. Curogram also encrypts all data in transit using TLS 1.2 or higher, so patient information stays protected as it moves between systems.
Audit logs are stored securely and can be exported for review at any time. Your compliance officer can use these logs during internal audits or when responding to regulatory inquiries. Having this paper trail in place builds trust with both your team and your patients.
To keep your integration secure over the long term, follow these best practices:
|
Pro Tip: Never share API keys through email or chat. Use a secrets manager like AWS Secrets Manager or HashiCorp Vault to store and distribute credentials securely across your team. |
If you're building a technical implementation guide for your internal team, include these steps in your security documentation. Catching issues early is always easier than fixing a breach after the fact.
The REST API is the backbone of most Curogram integrations. It follows standard web conventions that any developer familiar with web services will recognize right away.
All requests and responses use JSON format, which makes them easy to read and work with across different programming languages.
One of the advantages of a REST-based approach is that it doesn't require special libraries or middleware. Your team can start making API calls from any language that supports HTTP requests, whether that's Python, JavaScript, C#, or PHP. This flexibility means you're never locked into a single technology stack.
The base URL for all API calls points to Curogram's secure server. From there, you access different resources using standard HTTP methods.
Use GET to retrieve data, POST to create new records, PUT to update existing records, and DELETE to remove them. Each method maps to a clear action, so your code stays organized and easy to maintain.
Request headers should include your API key or OAuth bearer token along with the Content-Type set to application/json. Keeping your request structure consistent across all endpoints simplifies your codebase and makes it easier for other developers on your team to pick up where you left off.
The API returns standard HTTP status codes with every response. Rather than memorizing each one,
Use this quick reference table to understand what each code means and how to respond.
| Status Code | Meaning | What to Do |
|---|---|---|
| 200 | Success | Request completed. Process the returned data normally. |
| 400 | Bad Request | Check your request body for missing or invalid fields. |
| 401 | Unauthorized | Verify your API key or refresh your OAuth token. |
| 404 | Not Found | The endpoint or resource ID doesn't exist. Confirm the URL. |
| 429 | Rate Limited | Wait for the Retry-After period, then resend the request. |
| 500 | Server Error | Retry after a short delay. Contact Curogram support if it persists. |
Every error response also includes a message field with a plain-language explanation of what went wrong. This makes debugging faster, especially when you're working through your first round of integration testing.
For production integrations, consider building a centralized error handler that logs every failed response and triggers alerts for critical codes like 401 and 500. This helps your team catch and fix issues before they affect patient workflows.
For endpoints that return large data sets, the API supports pagination and filtering. You can set page size, sort order, and filter by fields like date range or status.
Curogram also uses API versioning to protect your integration from breaking changes when new features are released. The Curogram API documentation spells out all of these details for each endpoint.
When working with paginated results, always check for a next page token in the response. Processing one page at a time keeps memory usage low and prevents your integration from stalling on large result sets.
Curogram's API is organized around five main resource endpoints that cover the most common practice operations. Each endpoint has its own data model that defines the fields available for reading and writing. Understanding these models is the first step toward building a solid integration.
The table below shows each endpoint, its path, the HTTP methods it supports,
and the key data fields you'll work with most often.
| Endpoint | Path | Methods | Key Fields |
|---|---|---|---|
| Patients | /api/v1/patients | GET, POST, PUT | Name, DOB, phone, email, insurance |
| Appointments | /api/v1/appointments | GET, POST, PUT | Date, time, provider, status, patient ID |
| Messages | /api/v1/messages | GET, POST | Recipient, body, channel, timestamp |
| Providers | /api/v1/providers | GET, POST, PUT | Name, specialty, location, schedule |
| Locations | /api/v1/locations | GET, POST, PUT | Address, phone, hours, timezone |
The patients endpoint also supports custom fields, which is helpful for practices that track specialty-specific data points outside the standard model.
For example,
A dermatology practice might store skin type or allergy notes in custom fields that sync across systems.
Each endpoint returns clean JSON objects, and the Curogram developer docs include sample requests and responses for every operation so your team can get started quickly. Use these samples as starting templates when writing integration code to speed up development and reduce errors.
It's worth noting that all endpoints follow the same authentication and error handling conventions described earlier in this guide. Once your team learns the pattern for one endpoint, the others follow the same structure.
Webhooks let your system react to events as they happen in Curogram, without needing to constantly poll the API. When a patient confirms an appointment, sends a message, or updates their information, Curogram can instantly push that event to a URL you specify. This real-time approach saves API calls and keeps your data up to date.
Think of webhooks as a doorbell for your server. Instead of checking the door every few seconds, you wait for the bell to ring and then respond. This model is far more efficient than polling, especially for high-volume practices that process hundreds of changes per day.
Setting up a webhook starts with registering an endpoint on your server that can receive POST requests. You then configure the webhook in your Curogram admin panel, choosing which event types you want to listen for.
Common event types include:
Each webhook delivery includes a JSON payload with the event type, a timestamp, and the relevant data. Curogram signs every payload with a secret key so your server can verify that the request actually came from Curogram.
This validation step is important for security, especially in a healthcare setting where data integrity matters.
Your webhook endpoint should return a 200 status code quickly to acknowledge receipt. If your processing takes more than a few seconds, accept the webhook first and handle the business logic in a background job. This prevents timeouts and keeps the delivery pipeline moving smoothly.
If your server is temporarily unavailable, Curogram's retry logic will attempt to deliver the webhook again at increasing intervals. You can also view delivery logs and replay failed events from the admin panel. For testing, Curogram provides tools that let you simulate webhook events in a sandbox environment before going live.
Not every practice runs on a modern, API-ready platform. If your EHR or practice management system uses HL7 v2 messaging,
Curogram has you covered. HL7 integration provides a reliable bridge between legacy systems and Curogram's patient communication features.
HL7 has been the backbone of healthcare data exchange for decades. While newer standards exist, many established EHR platforms still rely on HL7 v2 as their primary method of sharing information. Curogram meets these systems where they are rather than forcing a disruptive upgrade.
Curogram supports several HL7 v2 message types, including ADT messages for patient admission, discharge, and transfer events, as well as SIU messages for scheduling.
These message types follow the standard segment structure that HL7 developers already know, with fields like PID for patient identification and SCH for scheduling details.
If your system sends other HL7 message types beyond ADT and SIU, reach out to the Curogram integration team to discuss custom configurations. The platform is built to be flexible, and new message type support is part of the ongoing development roadmap.
Configuring the HL7 interface involves setting up a connection between your system's HL7 engine and Curogram's listener. You'll define the message types to send, map your fields to Curogram's data model, and set up acknowledgment rules.
The integration setup guide in the Curogram developer docs walks through each of these steps with examples.
Most HL7 configurations use a TCP/IP connection over a secure channel. Your IT team will need to open the appropriate network ports and configure firewall rules to allow traffic between your HL7 engine and Curogram's listener. Curogram's support team can provide the specific network details you need.
Testing HL7 messages is a critical step before going live. Curogram provides a test harness that accepts HL7 messages and returns detailed validation results. Common patterns include using ADT messages to keep patient demographics in sync and SIU messages to push scheduling updates from your legacy system into Curogram.
During testing, pay special attention to character encoding and segment delimiters. HL7 messages use pipe characters and carriage returns as delimiters, and even a small formatting error can cause a message to be rejected.
The test harness will flag these issues clearly so you can fix them before going live.
|
Key Takeaway: You don't have to choose between HL7 and the REST API. Many practices use HL7 for their legacy EHR connection while also using the REST API and webhooks for newer tools and workflows. Curogram supports running both methods side by side. |
Theory is helpful, but real-world patterns make the difference between a smooth integration and a frustrating one. Here are several proven approaches that practices commonly use when connecting their systems to Curogram. Leveraging Curogram EMR integrations ensures that data flows reliably between your EHR, messaging platform, and other clinical tools, minimizing errors and manual entry.
Each pattern below combines one or more integration methods to solve a specific workflow challenge. Pick the one that matches your most pressing need, then expand from there as your team gets comfortable with the platform.
This pattern combines the REST API with webhooks. Your system pushes new appointments to Curogram through the API, and Curogram sends status updates back through webhooks. This two-way flow keeps both systems in sync without manual intervention. It's the most popular pattern for API integration in healthcare settings.
Real-time sync is especially valuable for practices that send automated reminders. When an appointment is created in your EHR, Curogram picks it up instantly and begins the reminder sequence.
If the patient reschedules, the update flows back through a webhook so your EHR reflects the change without staff involvement.
Batch import works well for practices that need to load large numbers of appointments at once. Instead of sending one API call per appointment, you batch them together and send them in groups.
This reduces the number of API calls and is especially useful during initial setup or data migration periods.
When running a batch import, keep your group sizes manageable. Sending 50 to 100 records per batch strikes a good balance between speed and reliability. Include error handling so that a single failed record doesn't stop the entire batch from processing.
Two-way appointment confirmation uses webhooks to listen for patient responses and the API to update your scheduling system automatically.
When a patient confirms or cancels through Curogram, your EHR reflects the change right away. Patient demographic sync follows a similar pattern, keeping contact details, insurance information, and preferences aligned across platforms.
Demographic sync is particularly useful when patients update their phone number or address through Curogram's communication tools. Those changes flow back to your EHR automatically, which means your staff always has the most current contact information on file.

Data mapping is one of the most important steps in any integration project. It's where you define how fields in your existing system line up with fields in Curogram.
Leveraging EMR integration for data management ensures that patient demographics, appointment details, and messaging information stay consistent across platforms. Getting this right from the start prevents data mismatches that can cause headaches down the road.
Start by listing every field your system sends and receives during your most common workflows. For most practices, that means patient demographics, appointment details, and message content. C
ompare your list against the Curogram data models to see where things line up and where you'll need to make adjustments.
Standard fields like patient name, date of birth, phone number, and email map directly between most systems and Curogram. For less common fields, you can use Curogram's custom field mapping options to create your own associations. This is helpful for practices that track specialty-specific data points.
A few formatting details are worth paying attention to:
For multi-location and multi-provider practices, mapping gets a bit more involved. Each site and provider needs a unique identifier that both systems can recognize. Build a mapping table that your team can reference during development and testing.
The technical implementation guide for your integration should include this complete field mapping document. Spending time on this step up front saves significant debugging later and keeps your go-live timeline on track.
Testing is where your integration proves itself. Curogram provides a sandbox environment where you can send real API calls, trigger webhooks, and process HL7 messages without touching live patient data.
Request sandbox access through your Curogram account manager or the developer portal.
A good testing plan moves through stages, starting with individual components and building up to full end-to-end scenarios. Resist the temptation to skip ahead. Each stage catches a different type of issue, and problems are always cheaper to fix early.
Start with unit tests that verify each API endpoint individually. Confirm that you can create a patient, book an appointment, and send a message. Then move to integration tests that check the full flow from end to end.
For example,
Create an appointment in your EHR, verify it appears in Curogram, and confirm that a reminder goes out to the patient.
During integration testing, also check the reverse flow. Simulate a patient confirming an appointment through Curogram and verify that the status update arrives in your EHR correctly. Testing both directions ensures your two-way sync is solid.
Curogram provides a testing checklist that covers all the scenarios your integration should handle, including edge cases.
Make sure you test these situations:
Performance testing is especially important if your practice processes hundreds of appointments per day. Simulate peak loads in the sandbox to make sure your integration handles the volume without delays. Look for slow responses, timeouts, and memory usage patterns that could cause problems at scale.
Before flipping the switch, run a user acceptance test with your front desk and clinical staff. Let them use the integrated system with test data for a few days to catch any workflow issues. Staff members often spot usability problems that automated tests miss.
Gather feedback in a shared document so nothing falls through the cracks. Once everyone is comfortable and all issues are resolved, follow the go-live readiness checklist in the Curogram API documentation to launch with confidence.
|
Pro Tip: Run your user acceptance test on a Monday or Tuesday so you have the full work week to fix any issues before the weekend rush. Staff feedback during this phase is invaluable for catching workflow gaps that technical testing alone won't reveal. |
Even well-built integrations run into problems from time to time. The good news is that most issues follow predictable patterns and have straightforward fixes. Knowing where to look is half the battle.
Before diving into specific errors, make sure your basic infrastructure is healthy. Confirm that your server is reachable, your credentials are current, and your network allows traffic to Curogram's endpoints. Many apparent API errors actually trace back to infrastructure issues that have nothing to do with the integration code itself.
The most common errors fall into three categories: authentication failures, data validation errors, and network timeouts. Authentication issues usually come from expired tokens or incorrect API keys. Double-check your credentials and make sure your token refresh logic is working properly.
Data validation errors mean a required field is missing or in the wrong format.
Network timeouts can happen when your server takes too long to respond or when there's a connectivity issue between your system and Curogram. Implementing proper retry logic with exponential backoff helps your integration recover gracefully from temporary network hiccups.
A fourth, less obvious category is timing errors. These happen when your system tries to update a record that hasn't finished being created yet. Adding a short delay or a confirmation check between dependent API calls usually resolves this type of issue.
Curogram provides detailed error codes with every failed response. The error reference section in the Curogram API documentation lists each code along with its cause and suggested fix. Beyond error codes, your integration logs are your best friend. Log every API call and response so you can trace problems back to their source.
Build a simple health check script that tests your most critical endpoints every few minutes. If the script detects a problem, it can alert your team before patients or staff notice any disruption. Proactive monitoring beats reactive troubleshooting every time.
If you hit an issue that you can't resolve on your own, Curogram's support team is ready to help. You can reach them through the developer portal or your account manager. For critical issues affecting live patient operations, there's an escalation process that gets your ticket to the right team quickly.
Every API has limits, and Curogram is no exception. Rate limits exist to keep the platform fast and reliable for all users. Understanding these limits helps you design an integration that runs smoothly without hitting walls.
Curogram's rate limits are measured in requests per minute and requests per hour. The exact numbers depend on your plan level, but typical limits give you plenty of room for normal operations. If you do hit a rate limit, the API returns a 429 status code along with a header that tells you when you can try again.
Rate limits apply per API key, not per endpoint. That means a burst of calls to the appointments endpoint counts against the same limit as calls to the patients endpoint. Keep this in mind when designing integrations that touch multiple resources in quick succession.
For practices with high volumes, here are some ways to optimize your API usage:
|
Did you know: Most practices use less than 20% of their available API quota during normal operations. If you're consistently hitting limits, it usually means your integration is making duplicate or unnecessary calls that can be optimized. |
Monitor your API usage through the Curogram dashboard, which shows call volumes, error rates, and response times in real time. These performance practices should be part of every integration setup guide your team follows.
Staying ahead of limits means your patients never experience a delay caused by a technical bottleneck.
If your practice is growing fast and you expect to need higher limits in the future, talk to your Curogram account manager about upgrading your plan. Rate limit increases are straightforward and can usually be applied within a business day.
Launching your integration is just the beginning. Like any piece of software, it needs regular attention to stay healthy and up to date. Curogram releases updates and improvements on a regular cycle, and your integration should keep pace. A neglected integration doesn't just miss out on new features.
Over time, deprecated endpoints and outdated authentication methods can cause silent failures that are hard to trace. Treating maintenance as a routine part of your IT calendar prevents these problems from sneaking up on you.
Subscribe to Curogram's developer newsletter and API changelog so you know about new features, deprecation notices, and breaking changes before they affect your system. When a new API version is released, you'll typically have a generous migration window to update your code.
The Curogram developer docs include migration guides for each version change. When reviewing a new version, start by reading the changelog summary.
Most updates are backward compatible and add new fields or endpoints without breaking existing ones. Focus your attention on anything marked as deprecated, because those items will eventually be removed.
Schedule regular audits of your integration at least once per quarter. Check that data is flowing correctly, error rates are within normal ranges, and no endpoints have been deprecated. This is also a good time to review your security practices, rotate API keys, and update any stored credentials.
During each audit, run a quick comparison between a sample of records in your EHR and the corresponding records in Curogram. This spot check catches data drift that might not trigger an error but could still affect patient communication accuracy.
Curogram offers ongoing support resources for developers, including community forums, knowledge base articles, and direct access to integration specialists. Keeping your integration current isn't just about avoiding errors. It's about making sure your practice gets the most value from every feature Curogram offers.
Building a strong integration between Curogram and your practice systems doesn't have to be overwhelming. With the right plan, clear documentation, and a step-by-step approach, your team can get up and running faster than you might expect.
Everything you need is laid out in the Curogram technical documentation, from authentication basics to advanced webhook configurations.
The key is to start with a clear understanding of what your practice needs
. Pick the integration method that matches your current systems, whether that's the REST API for modern platforms, HL7 for legacy setups, or webhooks for real-time event handling. Map your data fields carefully, test thoroughly in the sandbox, and bring your front desk staff into the process early.
Once your integration is live, the benefits speak for themselves. Your staff spends less time on manual data entry. Appointment reminders and patient messages flow automatically. Your scheduling system and patient communication tools stay in sync without anyone lifting a finger. That's the kind of efficiency that helps your practice grow.
If you're ready to take the next step, Curogram's integration team is here to help. Whether you need help reading the Curogram API documentation, setting up your sandbox environment, or troubleshooting a tricky data mapping issue, you don't have to figure it out alone.
Book a demo today to see how Curogram connects with your practice systems and to get your integration project started on the right foot.

💡 Curogram EMR integrations connect your electronic medical records system with a HIPAA-compliant communication platform. The software supports...
-1.png)
💡 HL7 and FHIR are the two most important healthcare data exchange standards used today. HL7 version 2 has been the backbone of healthcare...

💡 Curogram is a HIPAA-compliant patient texting platform built for medical practices. It offers two-way text messaging, automated appointment...